Planting Trees
Recent studies have confirmed that around the United States, and indeed around the world, one of the biggest killers of trees in the cultivated landscape is the way in which they have been planted.
It is not that no
one has been trying to do the right thing, but some of the practices that
have crept into general use have been shown in careful studies to do damage
that may show up rapidly, or may take many years to develop.
Here are the latest recommendations, which apply whether the tree is from a container or has been dug from the field:
1. Before digging the hole, remove all soil from above the root flare. This is the region of the trunk which is starting to get wider as the complement of major roots grows out from it. The easy way to explain it to a worker is that the top of the highest large root should be exposed. If the tree has been too deep in the nursery, there may be smaller roots in this layer of excess soil which should be cut off completely.
2. Measure the distance from the bottom of the soil ball or container to this topmost exposed root.
3. Dig the hole about 10% (or at least 2") more shallow than this measurement. Make the hole as wide as possible, and at least 1.5 times the width of the soil ball or container. Dig the hole with sloping sides or at least loosen any glaze on the sides if an auger has been used.
4. Put the tree in the hole,
checking where the main structural branches will be in relation to traffic
or buildings if the tree is that big, and positioning it accordingly.
If the tree is from a container, check for roots that were circling and
tease them out or cut them. Remove any strings and burlap from at least
the upper side of the rootball. Artificial burlap should be removed completely.
Wire baskets may or may not be harmful: many professionals prefer to remove
at least the top 12-18".
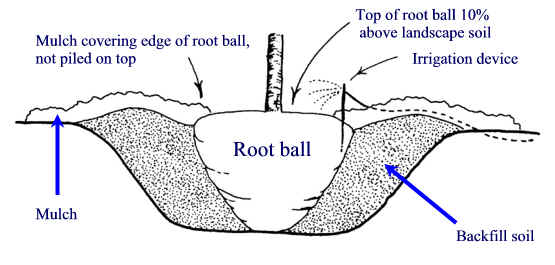
5. Refill around the root ball using the same soil that came from the hole. Use whatever means you prefer to avoid big air pockets in the soil. Fill only to within a couple of inches of the top of the tree soil ball, leaving the sides of this rootball exposed. If you wish to make a ring of soil to hold water, let this be a few inches outside the exposed sides of the rootball.
6. Mulch around the tree to cover the exposed sides of the soil ball, but with at most only a very light dusting for cosmetic effect over the soil ball.
7. Remove existing stakes from the tree (better yet, do not buy a tree tightly tied to a stake). If the tree will need support to prevent the soil ball moving in the ground (as opposed to a tree that needs a splint to hold its skinny trunk upright), do this in a way that will allow the trunk to flex.
8. Arrange an irrigation program
for the tree. Best is one or more individual microspray devices that will
water the old root ball evenly. Watering is needed for much longer than
we have been accustomed to thinking: reckon on 3-6 months for each inch
of trunk diameter. Frequent light waterings are most effective on newly
planted trees and shrubs, which is the opposite of watering recommendations
for established plants.
Additional information may be found in 'Back to the Roots', a well-illustrated article by Colin Crosbie and Tony Gregory in the January 2002 issue of The Garden. (Journal of the Royal Horticultural Society).
The whole area of trees in landscapes is covered by Dr. Ed Gilman at
http://hort.ifas.ufl.edu/woody/planting/index.htm
Give yourself plenty of time, this site is a goldmine of information.
The illustration is used, with permission, from that site.
Back to Magazine Table of ContentsBack to 'How to...' Table of Contents